This 5 mega pixel camera is a fully-featured intelligent security camera based on AMG-Panogenics’ powerful digital imaging processing.In order to set this up correctly in Milestone and benefit from the generation of multiple images including panoramas and de-warped ‘views’ of different areas, you will need to use the Panocam360 Plugin for Milestone. See the step by step approach below for successful install and configuration of this excellent camera.
Using AMG-Panogenics Panocam360 with Milestone XProtect
Software
1. From Browser go to camera’s network webpage and ensure ONVIF Server is Enabled. If, not
click Enable ONVIF, Save Settings and Restart Camera.
2. Run the Milestone XProtect Management Application
a. In Advance Configuration, right click Hardware Devices and select Add New Hardware Device
b. Select Advanced and Next
c. Add an IP range which includes the camera IP address eg 192.168.1.100 to 192.168.101, and check the Use box
d. Add the camera username and password, default Admin Admin
e. Click Select… and select the ONVIF Conformant Device (2-16 channels)
f. Click Next >
g. Detection should find the camera(s). Select Admin user and type Admin password. Click Use and Next >
h. Uncheck all cameras except camera 1, click Next>
i. In left panel, select Hardware Devices- Hardware Device 1- Camera 1 (or camera just added) and check fisheye image stream appears
3. Install the Panocam360 Plugin
a. Unzip and copy Panocam360DewarpPlugin folder to the Milestone
XProtectSmartClient Plugins folder, normally C:\Program Files\Milestone\XProtect
Smart Client\MIPPlugins
4. Run the Milestone XProtect Client
a. Connect to Server and Click Setup
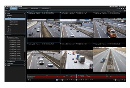
b. Create a new View of the required size and format
c. Drag the Panocam360DewarpPlugin into the view
d. Click Properties-Select-Camera on the left and select the Panocam360 camera number
e. Click Setup button again to exit setup
f. PTZ should now be available in Live and Playback